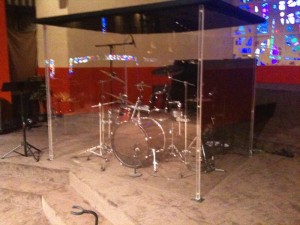
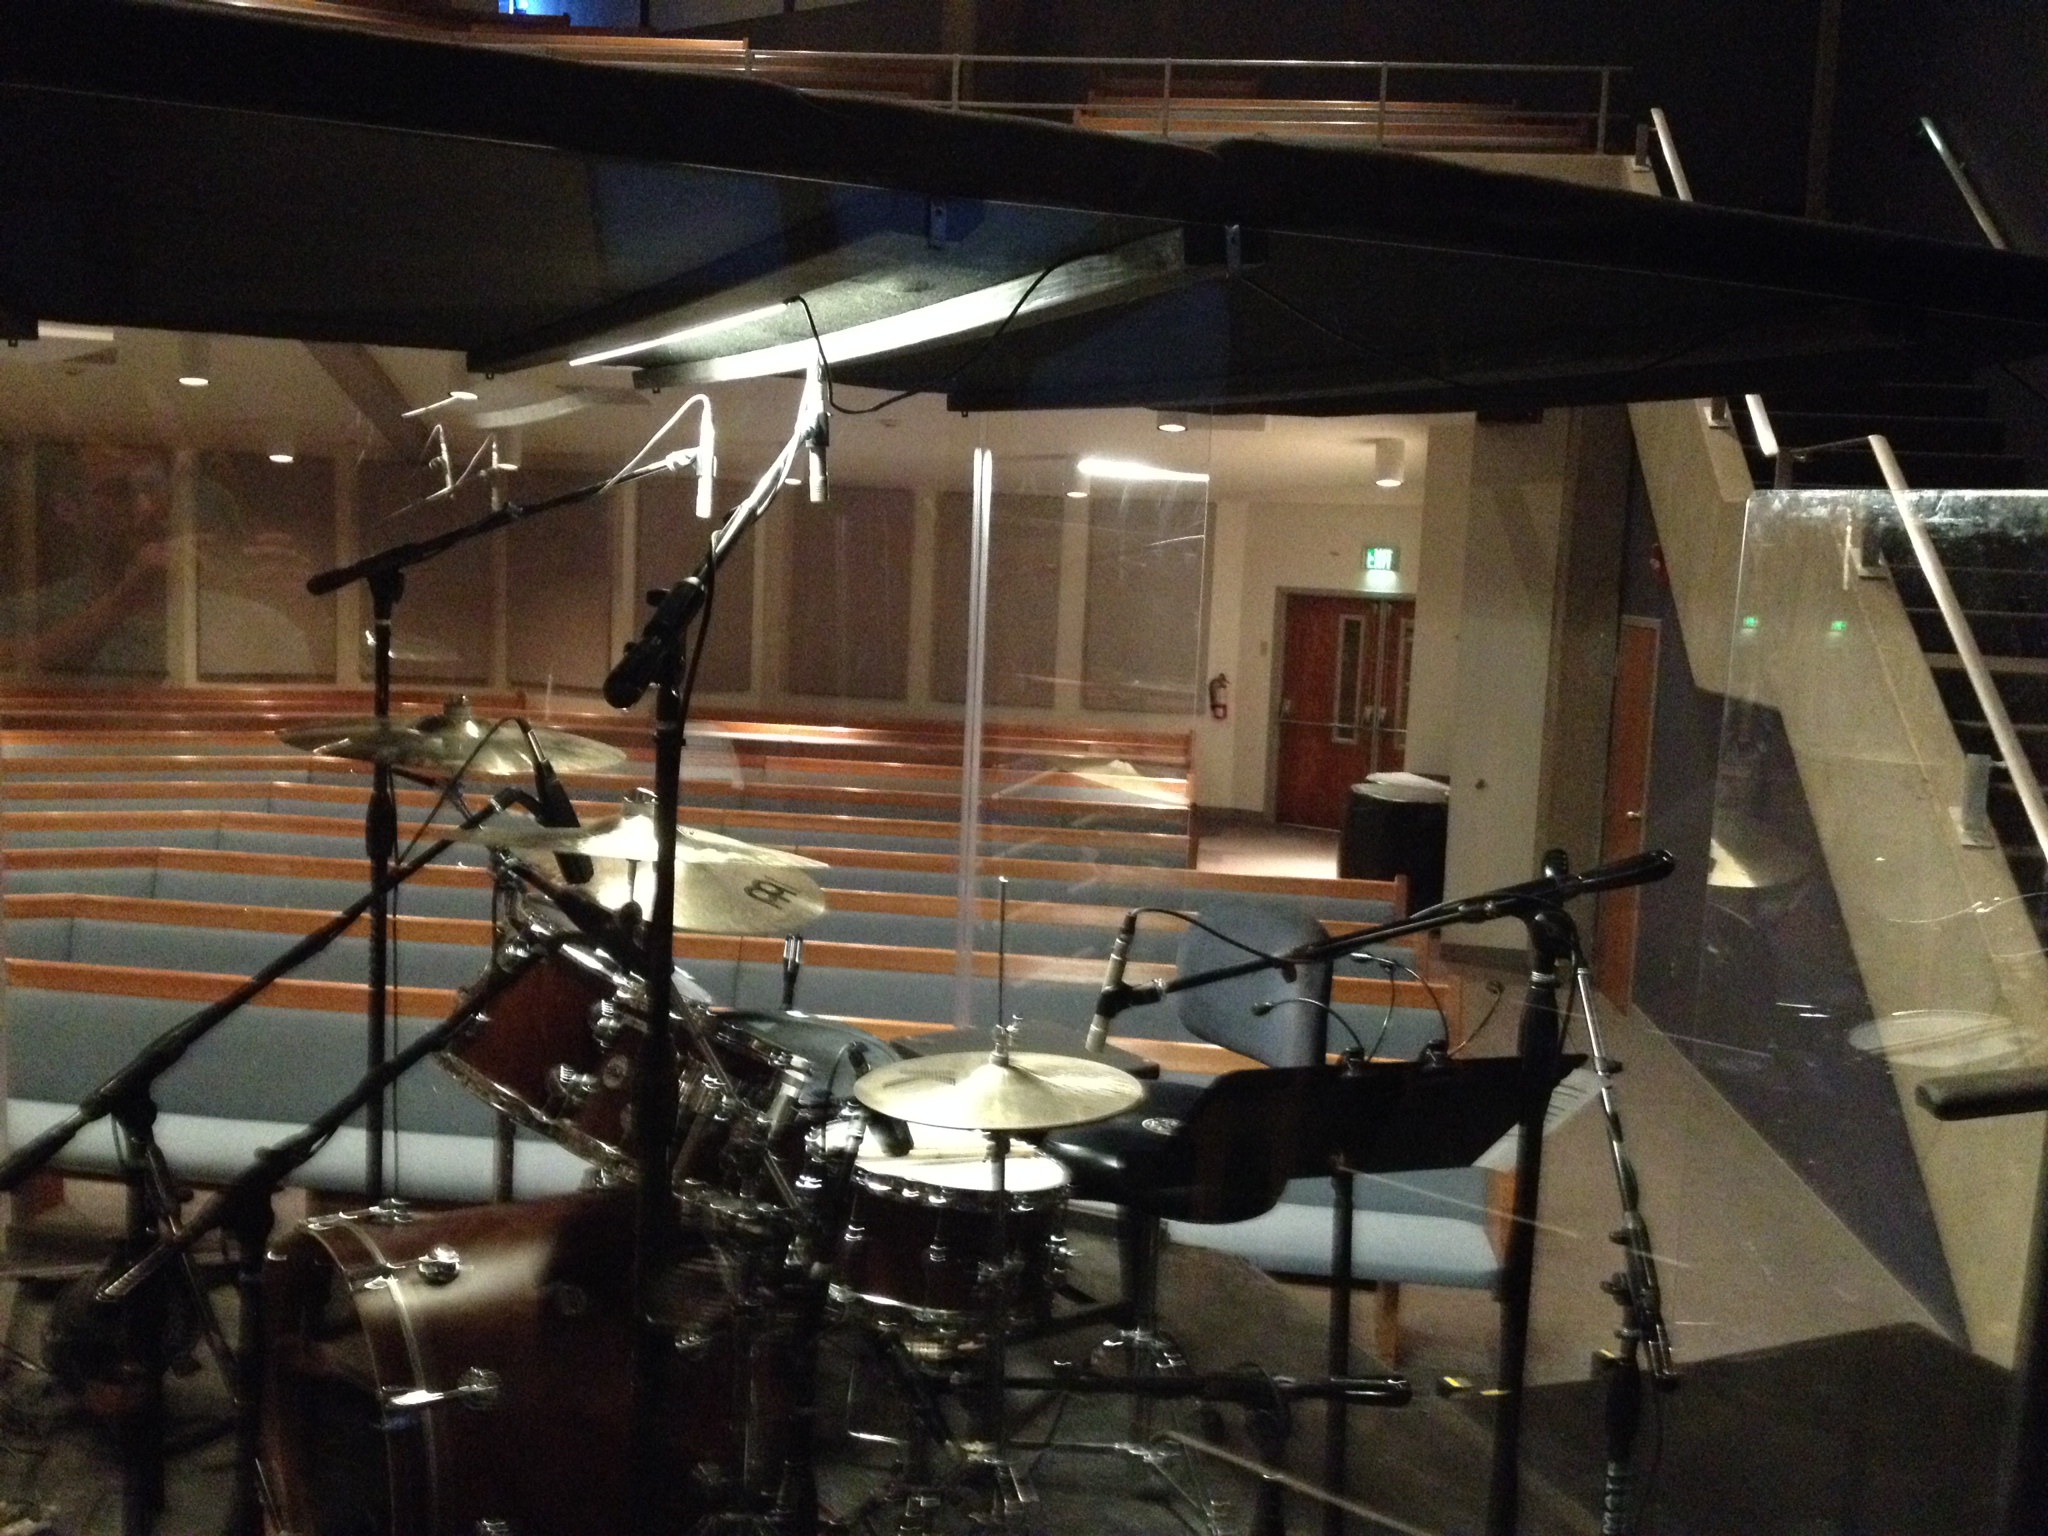
 My most visited blog post over the past year (by a long shot) was on building a new drum booth.  Call it a drum booth, drum shield, drum cage, whatever – the bottom line is that sometimes the acoustics of a room will create a need to control the sound of your drums.  I wanted to get a little more detailed with the specs, materials used and the things I learned so I’ve written an updated post here.
Start talking about building a drum booth and some people start talking about using an electric drum kit. Â Not me, no way…I believe electronic drums are of the devil. Â My feeling is that if you’re gonna have drums in your band, then play with an acoustic kit.
There were some specific challenges I had in building this particular booth due to the room it was in. Â I’ll try to leave out things that won’t apply to everyone. Â There were also some political matters that I won’t go into here….you know, sometimes there’s the insane pastor’s wife you have to deal with.
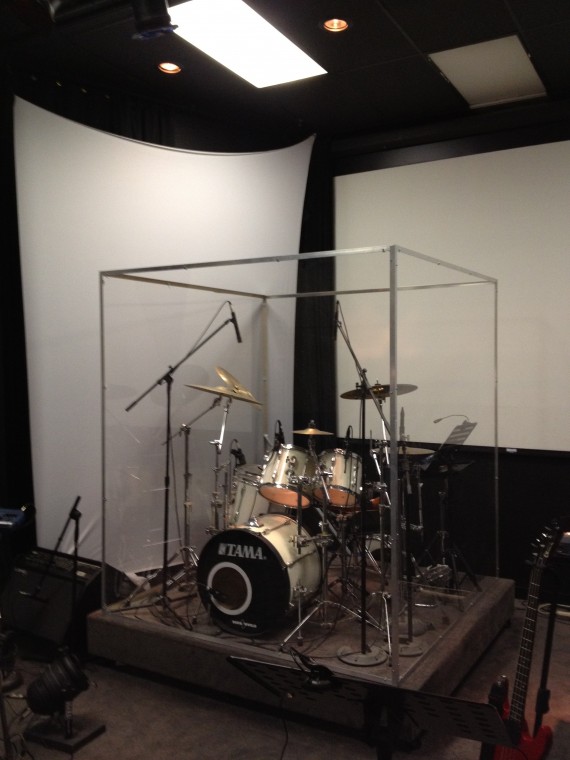
My goal was to build a booth that contained sound and visually kept the drummer as unobstructed as possible. Â I wanted it to look and feel feel like he was part of the band, not tucked away in a box. Â My first choice would be to go without a top/lid, but the acoustics of some rooms will amplify sound shooting up. Â You’ll also need to consider reflected sound exiting the back of the booth. Â Something will need to absorb those reflections wether it be theater walls, curtains or sound panels. Â This will be determined by the room and space you’re dealing with.
PLEXI-GLASS SPECS
Front Panel: Â 7.5′ Wide x 6′ High
Side Panels: Â 5.5″ Wide x 6′ High
Thickness: Â .220″
Cost: Apx. $650
These panels are heavy but two people can move them pretty easily. Â The main issue I had with the size was preventing a slight warping or bending as the panels stood. Â I could see wanting a thicker plexi in the hopes it would be a bit stiffer but my concern would be the sheer weight of it.
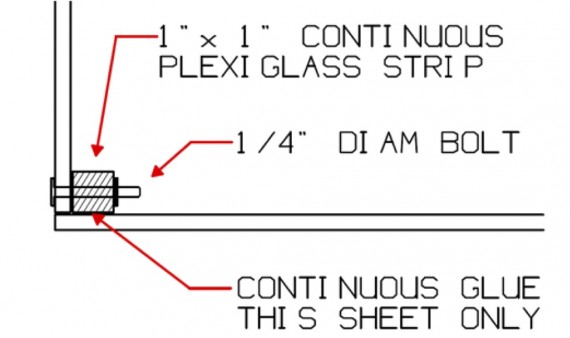 To attach the corners, we decided to use 1″ x 1″ x 6′ solid plexi strips. Â We glued them to one surface and then drilled holes and attached the other piece with a bolt (see schematic.) Â To prevent the slight bending/warping, we also glued one of these strips at the back end of each side piece for additional support. Â Worked great.
SOUND-PANEL SPECS
Owen’s Corning 703 Rigid Fiber Insulation
Sheet Size: Â 2′ x 4′
Thickness: Â 2″
Weight: Â 3 lb
Cost: Â Apx. $1.60 sq/ft (depending on qty)
These sheets of insulation do a terrific job of absorbing sound. Â We used three aluminum rods and fashioned ‘u’ brackets on the ends to sit on the top edge of the plexi-glass and serve as cross-brace supports for the lid. Â The insulation sheets were wrapped with an acoustic burlap fabric. Â 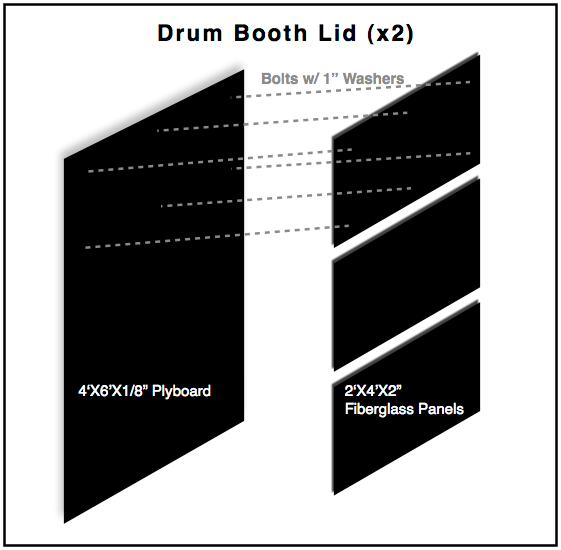 We used 6 sheets for the lid and 4 sheets to absorb early reflections at the back of the booth. Â To create connected panels of 3 lid sheets for easier handling, we took 4′ x 6′ pieces of 1/8″ plyboard, painted to match, and ran bolts through the sheets and plyboard. Â That gave us two panels for the lid, much more convenient than 6 smaller sheets.
The next matter is lighting. Â This should be handled depending on your current platform lighting scenario. Â One thing to consider, if you place floor lights near the drum booth, use LED lighting. Â Traditional PAR cans generate a great deal of heat and will melt and warp the plexi-glass.
The overall results were dramatic. We finally had control the drum volume in the room, were able to mic the drums and mix them into the house. Â The main mix improved as ton because we could get sonic clarity and separation with the band. Â Aesthetically I really like the solid plexi front of the booth rather than the vertical lines created by the 2′ panels from typical consumer drum shields. Â Like I said, my first choice would be to go without a lid, but unfortunately it’s a necessity in some rooms.
I welcome any questions you might have. Â Feel free to post your thoughts or questions as comments below and I’ll do my best to help and answer what I can.
Have you built a custom drum booth? Â Are you building one?
Do you have any questions about building a booth for your space?
Leave a comment below…
As they come in, I’m going to post pics sent to me from those of you who have built your own custom drum booths…

ビットキャッスル ドロップ
Bitcastle
https://hlsports.de/
https://gazetablic.com/
https://alterego.re/
vps аренда в европе
vps аренда в европе
аренда vps в европе
Как я переделывал балкон в кабинет в Туле
Мой балкон в тульской панельке был складом для всего подряд пока я не понял что могу сделать там кабинет своей мечты. Сначала соседи крутили у виска говорили что место пропащее и ничего не выйдет. Но я доказал что даже 4 квадратных метра можно превратить в уютное рабочее пространство. Пришлось разбираться с утеплением искать хорошие стеклопакеты в Туле и продумывать каждый сантиметр. В итоге получился уголок где я теперь работаю с удовольствием. В заметке показываю как утеплял балкон без мостиков холода где нашел недорогую мебель и как организовал освещение чтобы не напрягать глаза. Вы узнаете почему не стоит экономить на гидроизоляции и как сделать ремонт на балконе без разрешения. Читайте если хотите создать свой личный кабинет когда места в обрез.
Andy,
Thank you for this site! I am in the middle of an enclosure build for our church, that will periodically need disassembly and storage. When you do have to tear down your enclosure, are there any tools in particular you use to help transport the acrylic sheets? Also, have you had to clean up any scratching and what did you use for that? Thanks in advance!
Hi Joe – this was a pretty specific build for the church I was at. I’m no longer there so I honestly can’t speak to how they deal with moving and caring for the plexi sheets. Best of luck to you man!
Hey Andy,
I’m trying to build drum booth for my church. Where did you buy plexyglass from?
Thanks.
got mine at lowes.
Pingback:Drum Cage | CCC Production
Hi Andy, I am in the process of designing a sound shield for our drummer. At present we only have the kick drum mic’d and I as a sound man have no control over the drummers volume ans it is way too loud. I am wanting to know how I know if I will need to put a canopy/roof on the shield? Or not.our church building is basically a huge rectangular hall with very high ceilings. My current design does not allow for a canopy and I do not want to lay out a lot of money only to find it would need one. Any help will be appreciated.thanks.Neil
A shield only, without an absorbing lid or something on the back to absorb early reflections, will really only serve as a minor deflector of sound. The sound waves will travel upward and then, depending on the acoustics of the room, potentially only be slightly quieter than without a shield. The plexi-shield is simply one component of trapping and absorbing sound while allowing the drummer to be visible to the audience and good line of sight to connect with the rest of the band.
On regard on your drum shield, can you send me more angled pictures of the cage???
Hi Anthony…sorry, but I don’t have any other pics of that drum shield. Cheers!
hey andy could i build one bigger than what i looked at
having bigger sides than 5.5 wide x 6 high
i actually need one big enough so i can place more cymbals than 3, chimes, and have room for a congo set with bongos and add a cut out plexi door with hindges…
what side do i need to build it???
I need the led on the drumset but my only issue is ventilation how can I get ventilation I the drum booth
Hey Andy quick question. I’m about to build the same thing pretty much but wanted to know if i use studiofoam, the wedges 2inch deep. would it give me better or worse isolation. I just don’t want to wrap the material. Is there another material that will do as good of a job for the money? Thnx
Hey Dave –
Studio foam would do the trick, but I’m not sure it’s solid enough to hold shape unless you reinforce it somehow. I’m really not sure what other material you’d need to look at if you’re not wanting to wrap an insulating material or foam.
Best of luck man!
Thanks, But i was just gonna use a sandply sheet on top and run trim on the sides where it overlaps the glass.
and those fiberglass sheets aren’t bad for the drummer by any chance?
No, the fiberglass isn’t bad for the drummer. It’s just a good idea to wrap it for cosmetics and so that it doesn’t fray.
hey andy..iam from india and most of the people hate the sound of drums in my apartment.
can u tell me the easiest method of making a drum booth???we dont get most of the materials like di am bolts near by!
Does anyone have experience building a small booth for home practice? A lot of the specialized materials look rather pricey. Was wondering if anyone had words of wisdom for woodshedding.
Sure. I am actually building a cheap one right now. You can use 2x4s (or 2×2), hinges, plywood, braces, and a little bit of plexiglass. $100-$250 depending on style and material grade.
You need:
2- sheets plywood (or particle board) $20-$50
8- 2x4s (or 2x2s) $20-30
8- hinges- $20-$35
12- brackets
Plexiglass, As much as you want to see out of (or none if you don’t care. Just buy one more sheet of plywood.
2x4s will be more sturdy, but bulkier. If you build it in a corner you only need to sides, and less material. Then you can easily put it away. Then get one sheet of foam board for the ceiling. Hope this helps.
Hi Andy, This is a fine looking booth! I really like the lack of seams and the unobstructed view. Could you describe how you’re micing the kit? And is your drummer having any issues with volume inside the booth. We use IEMs; do you think additional ear protection would be required? Also, Our riser sits about 18 inches out from the rear wall. If we have panels on the wall but leave that gap do you think we’d have too much leakage? We could build a rear wall but would have to address a door/entry point also. I would be interested to see some additional pictures if you have them.
Thanks!
Matt
Hi Matt –
We used mic clips on the toms, a shorty boom stand for the kick and boom stands for the snare, hat and overheads.
Volume for the drummer should not be an issue, especially using IEMs. I can’t imagine additional ear protection being necessary…makes me want to crack a few “sensitive drummer” jokes. 🙂
If you have panels on the back wall and a gap for entry, I really don’t think you’ll deal with much bleed into the room. There will be some, but you’ll have contained the majority of sound and should get great control at the FOH.
I wish I had additional pics for you, but I’m no longer with the church where I built this booth.
Best of luck to you man!
We are looking into building a new shield for myself. My problem is finding a company that provides the large sheets of plexi glass. The glass companies that we have contacted do not have access the size or they want to charge almost $2000 for the glass. The other problem is the pastor wants to totally enclose me, but I say, NO! My riser is an 8’ by 6’ and the current shield is a store bought, small shield. I need away to stay cool, be able to move my drums (for tuning and other side-gigs), and keep the congregation and pastor happy. I am thinking an 8’ front with 3’ sides at 6’ high w/roof.
Hi Ryan –
I would see if someone you know or in your church is a general contractor. Go thru them to try and find a company to provide the plexi.
The guys at Gateway Church in Southlake, TX make a great drum enclosure…downside…it costs a smooth $10K…pocket change!
Hi, I am about to build a booth with the plans you have here. My question is I will need a door, so do you have any ideas on how to add one. I was going to cut about a five foot rectangle out of the back, put hinges on it and some sort of laching system. Another thing, the way you explained doing the roof makes no sense to me. The way I read it it sounds like the roof itself you painted a pice of plywood black and stuck some wood planks wrapped in burlap and bolted it with u-bolts. Am I correct? Also how did you reinforce the roof in the middle. If you didn’t does it sag. Thanks for your help and thanks for posting this.
Five foot high two foot wide door
Hi Douglas – First, the roof was a simple enough concept and you’ve pretty much got it. We didn’t use ‘u-bolts’, just bolts w/ 1″ washers. The burlap was wrapped around the insulation panels to absorb sound, not around wood planks, then attached to the painted plywood sheet. We didn’t have sagging issues because we used the aluminum rods (you could use conduit as well) and then fashioned a ‘u-bracket’ to connect the rod to the top of the plexi. It worked well.
Finally, I didn’t build a door. Heat was definitely a consideration because this was in Phoenix. We used panels of the burlap wrapped insulation to handle early reflections out the back of the booth. There’s no reason you can’t do a door, but remember ventilation for the poor guy stuck in there sweating like a melting stick of butter…especially if you light him with anything besides LEDs.
Thank you. Ya that is a major factor in the planing is the vintalation. Im the drumer and our worship leader has put me over getting rid of the electric. Not as esay as i thought but you have just solved most of my problims with the booth. thank you.
Best of luck to you man. Would love to have you send me a picture of the completed booth. I’ll post it on this page for others to check out what you did.
Will do. More questions, where did you buy the plexi strips. Can’t find them online. Also is the roof all the way butt up agenst the back of the booth. if so do you think (for ventilation) it would be a good idea sound wise to have a 6-12in gap in the pack of the roof. Our church is not necessarily small, it runs about 125-150 people, its just the way the instruments are set up so close together the drums override everything (previous drummers didn’t know how to control volume) and from a political standpoint, we MUST have a full booth.
We priced and purchased them from a local glass company. Too heavy to buy online. Yes, the lid fit even with the back of the side-plexi pieces. I would think it better to have ventilation at the rear of the booth and then use absorption panels to catch early reflections. An opening on top will just send sound up and out into the front of house. Having it at the rear will allow you to try control more sound.
how many plexi strips did you use in total?
Hi Andy. Great post. My question is the entry / exit… If it’s all bolted together, what entry / exit solution do you have so it’s easy to get in / out of ? Also, My church may be building one next month, and have heavy stage curtains directly behind the drums…so, should we do a 3 panel solution (with a lid) or to a 4 panel with a lid? (definitely will be doing a lid, as we need lots of sound control) Thanks so much for your help!
Hi Chris –
I just built a 3 panel cage with lid. The back is open but had the panels to catch early reflections. Sounds like your stage curtains may take care of that issue. The drummer should easily be able to enter/exit without a back enclosure…although it would probably be more entertaining just to bolt the thing shut and leave him there like a hamster and drop food and water in occasionally.
Let me know how it works out for you.
Sweet! We may try that. And FYI, I AM the drummer! LOL ;0
Pingback:Drummers Behind Glass - How to Build A Drum Shield
andy,
we are building a cage using yours as the framework. you indicated that you used 3 aluminum rods, bent at the ends, to provide support for the ceiling. I don’t see those in the picture and so I am wondering if you talk about how necessary that would be if we put more support in the ceiling pieces itself? Also, what do you use for your led fixture inside the enclosure?
brian
What type of gule did you use to glue the plexi strips on? any surface prep required before glueing?
Hi Austin – I used a plexi-glass glue. We purchased it from the company that sold us the plexi. It required no surface prep, was a clear liquid that fused the plexi together. It’s not an immediate bond so we clamped the pieces together and let them sit overnight.
What was the thickness of the plexi that you used?
It’s listed under Plexi-Glass Specs above: Thickness: .220″
Sorry completely missed it.
I love the look of this, and would like to build one. My question is related to mobility. We have to move our shield and drum set off the stage from time to time. How easy is it to move your booth? With the sides being glued together, it has to move as a unit, right? Would hinges be an option?
Hi Bryan –
We had to move it from the platform a couple times. It takes a couple people but is totally doable.
What was glued together was a 1″x1″x6′ piece of plexi to each of the side panels. The front panel then bolted to the assembled side panels. This allows for the bolts to be removed and the panels relocated.
We decided against hinges because of the weight of the plexi panels. It also provided a gapless corner which kept sound from escaping.
Very nice! Tell us about the leaks and the coloration inside the booth? Is the plexiglass such a good sound insulator and absorber?
Not sure what you mean by ‘leaks’…but if it’s sound escaping the booth, then you’re dealing with sound are at the rear of the booth. That is why we set up absorption panels behind the booth to deal with early reflections.
Lighting is an issue inside the booth, but you definitely need to use LED lights because the heat will warp the plexi.
Plexiglass does not absorb sound, it blocks/reflects it while allowing you to see the drummer. The insulated panels are what absorb and insulate sound.
hey, thanks for posting this. We’re getting ready to do the same thing. Can I ask where you purchased the glass from? Thanks!
Hi Lance –
I got the plexiglass from Professional Plastics in Phoenix, AZ. They were a local vendor for me so we were able to pick the order up without shipping costs. I’m sure you could take the specs to most any glass company or plastics vendor. Just call around in your neck of the woods to see what’s available. Would love you to post pics here of your completed project.
Andy,
Was $650 the cost for the shield only, or did that include the cost of the lid? Any chance you could post some pics, or prints of how the lid went together? Thanks!
Hi Ben – The $650 was just for the plexi. I didn’t include a total project cost because we purchased some extra insulation panels for additional soundproofing on the walls behind the platform.
I’ve added a schematic for how we built the lid panels. I hope that helps.
I am looking into doing almost the exact thing for our church. I really like your design. I am worried that panels that big will not be as sturdy and will bow out. Have you have any problems with that? The majority of the pre-made booths out there have absorbing boards lining the base of the booth. Is this everything that you use or have you added more board since this picture?
Thanks,
Jordan
The ‘bowing’ isn’t an issue on the front panel because of the reinforced 1″x1″ corners. The ‘bowing’ we experienced was on the side panels because there wasn’t enough structural support at the rear. When I noticed that, I also glued a 1″x1″x6′ piece at the back of each side piece. That helped dramatically.
I hated all the pre-fab designs with 2′ wide pieces (the vertical lines are an eyesore IMHO) and did not like the panels at the base of the booth. I like a clean visual into the booth.
If you build a booth, post some links to pictures of what it looks like in your space.
Good luck!
We finished the first phase awhile back and I forgot to post a pic. Not sure how to link a pic though…
Would love to see it Jordan. Try emailing me at andyallen (@) andyallen (.) com and I’ll link to it here.